

There are many ways to resize a window, but sometimes you need to resize a window to a specific size. Usually, if you are creating a screenshot you need to set the window size in pixels in order to fit it on your web page. You may also want to preview how an application looks at a certain size. Undoubtedly, there is a very simple keyboard shortcut that will let you set the size of the window in pixels and resize it instantly.
Screen Capture And Annotate provides an option to resize windows with the press of a key combination. In addition to that, it will let you take screenshots and annotate them. Certainly, it can capture transparent windows and round corner windows with transparency and shadows. For example, such windows are the ones of Windows 7, Windows 10, and Windows 11.
How to Set Window Size in Pixels
- Download and start Screen Capture And Annotate
- Then switch to the window that you want to resize
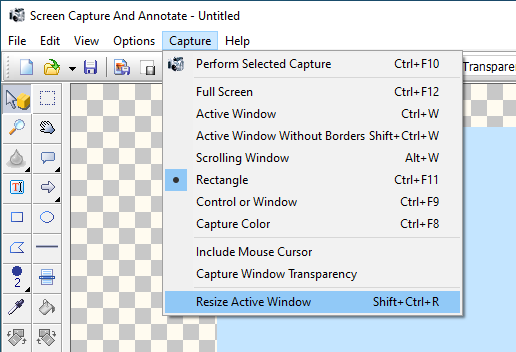
- After that, press CTRL+SHIFT+R (RESIZE). If you do not like the key combination, you can set a different one in the settings.
Resize Window
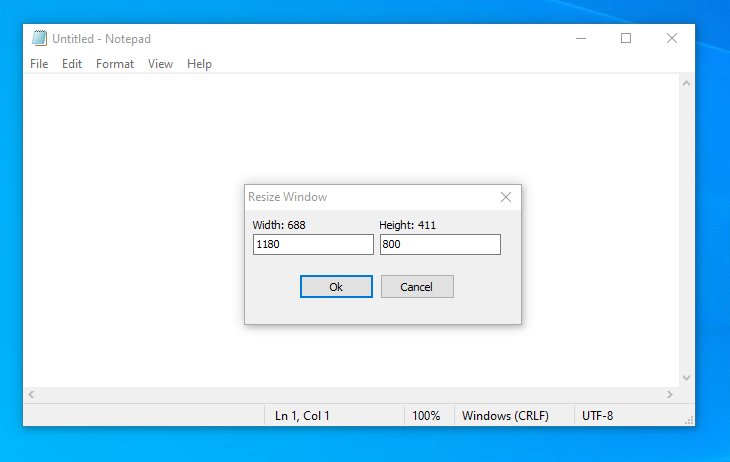
- The tool displays a dialog with the current window size and edit fields to specify the new window sizes.
Set Windows Size in Pixels
- Enter the new window width and height in pixels in the fields and press OK.
- The tool instantly resizes the windows to the specified dimensions.
Resize a Window Using Keyboard in Windows
Follow the below steps
- Switch to the desired window using Alt + Tab.
- After that press Alt + Space shortcut keys together on the keyboard to open the window menu.
- Now, press S. The mouse cursor will turn into a cross with arrows.
- Then use the left, right, up, and down arrow keys to resize your window. Press and hold the CTRL key while using the arrows in order to resize the window with a one-pixel step.
- When you have set the desired window size, press Enter.
If you are running Microsoft Windows 7, Windows 8, Windows 10, or Windows 11, you can use Windows key keyboard shortcuts to resize and arrange windows For example, pressing the Windows key and left arrow key resizes the window to fit the left half of the screen. In the same fashion, pressing the Windows key and the right arrow key resizes the window to fit the right half of the screen.
Capture and Annotate Screenshots
Screen Capture And Annotate can not only set precise window size in pixels, but it can also capture a screenshot of that window. Unquestionably, Windows has an integrated Snipping Tool already. Presently, it is way limited and can not capture round transparent windows and shadows. Undoubtedly, that is really a pity as all the latest Windows 11, 10, and 7 user interfaces are based on such features.
In addition to that, you can add annotations like callouts, highlights, arrows, blur regions, and many more. Most important is the fact that the tool uses layers and you can easily rearrange the screenshots and objects. Certainly, You can also combine multiple screenshots in a single image.
Added bonus to all that is the fact that you can update a screenshot without the need to annotate it again. That is because the tool can store the screenshots in a proprietary project file. If the subject that you want to describe has changed – for example, an application interface or a website, all you need to do is to take a new screenshot and replace the one in your project file. As a result, all the annotations will be kept and you can just reposition them slightly if needed.

Set Window Size in Pixels
Screen Capture Key Features
Screen Capture And Annotate is a powerful utility for creating and editing screen captures. It has the following features:
- Multiple capture options
- Full Screen
- Active Window
- Active Window Without Borders
- Rectangle – allows you to select a rectangular part of the screen using the mouse
- Window or Control – will let you capture a certain part of the application – button, toolbar, system tray, etc.
- Scrolling Window – will capture the entire area of a scrollable window by automatically scrolling
- Color – will capture any color on the screen setting it as foreground color and copying its value in the clipboard
- Add text annotations with different styles – balloons, rectangles, etc.
- Add arrows to point to certain parts of the capture or bidirectional arrow to denote the relation between different items.
- Highlight – easy way to put highlight regions over the captured images. Similar to using highlight markers.
- Different shapes – ellipse, rectangle, freehand polygons, etc.
- Rotate and scale captured images.
- Combine multiple captures in a single image.
- Insert an external image (logo, previously captured image, picture, etc.) in the current capture project.
- Supports many image file formats
- Load/Save of capture project that will allow you to edit or extend a previously captured project.
- Lifetime License!
Screen Capture Image Formats
Supported file formats:
- JPEG Bitmap (*.jpg;*.jpeg;*.jpe)
- Compuserve Bitmap (*.gif)
- Portable Network Graphics (*.png)
- TIFF Bitmap (*.tif;*.tiff;*.fax;*.g3n;*.g3f)
- JPEG2000 Files (*.jp2)
- JPEG2000 Code Stream (*.j2k;*.jpc;*.j2c)
- Targa (*.tga;*.targa;*.vda;*.icb;*.vst;*.pix)
- Paintbrush (*.pcx)
- Windows Bitmap (*.bmp;*.dib;*.rle)
- Windows Metafile (*.wmf)
- Enhanced Windows Metafile (*.emf)
- Windows Icon (*.ico)
- Windows Cursor (*.cur)
- Wireless Bitmap (*.wbmp)
- Portable Pixmap (*.pxm;*.ppm)
- Adobe Photoshop (*.psd)
Using Screen Capture and Annotate you can capture screenshots and resize window to specific size easily.