
Duplicate Song Finder - Audio Dedupe
Frequently Asked Questions

Below you will find the most frequently asked questions.
Click the question that you are interested in to scroll to the answers section. You can also use the search functionality in the web browser to find a particular keyword on the page.
Do not forget to check also the blog area as it contains a lot of information, tutorials and examples and provides a search option for easier navigation: www.mindgems.com/article/
Audio Dedupe Questions
- COPY, MOVE, or DELETE issues solutions.
- Why Should I Register?
- I can not download/register the product?
- How to exclude a folder from auto mark?
- How to disable self-scan for a folder or how to compare folder A against folder B?
- The application disappears when minimized.
- How many files can I compare?
- Do you sponsor educational institutions?
- The application freezes at %%, what is wrong?
- Which duplicate file finder to choose?
- I removed all my duplicate audio files, but they are still displayed in iTunes, but when I click a song in iTunes it is not found.
- The scan finishes immediately with no duplicates
Audio Dedupe Answers
Why Should I Register?
- Registered users get free support and minor version updates ( new minor versions of the product)
- Registered users can suggest extra features that they would like to be included in the product
I can not download/register the product?
Please read the instructions in your registration email carefully and follow them precisely. Please note that the login and password for the download are case sensitive so we recommend you to just copy/paste the information in bold blue into the corresponding fields.
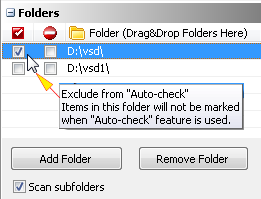
How to exclude a folder from auto mark?
In the folders list right click a folder and choose 'Disable Automark For This Folder'.
How to disable self-scan for a folder or how to compare folder A against folder B?
In the folders list tick the 'Disable self-Scan For This Folder' for the corresponding folder.
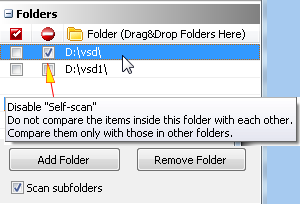
If you disable self-scan for folder 'VSD1' the images inside it will not be compared against each-other.
If you disable self-scan for the folders 'VSD' and 'VSD1' the files in 'VSD' will be compared against the files in 'VSD1' and vice-versa instead of comparing all the files in 'VSD1' and 'VSD2' against each other. This can be used for merging two folders or if you have split the scan process in parts. Assuming that duplicates inside 'VSD' and 'VSD1' are already cleaned the operating will remove duplicates that are found in both folders.
The application disappears when minimized.
When minimized the application will go into the system tray in order not to disturb your work. Please look in the system tray for the Audio Dedupe icon.
How many files can I compare?
There is no limit for the count of files that you can scan. Scanning huge databases of more than 500 000 files can be time consuming. Audio Dedupe is extremely optimized in terms of CPU usage and will run fast even on a slower machine. The hardware that will affect the scan process the most is the performance of your storage.
Do you sponsor educational institutions?
Yes we have already sponsored schools and universities in the past and we will be glad to do it again. Just contact us.
The application freezes at %%, what is wrong?
Due to the huge amount of data that the application processes it is possible to find damaged files in your audio collection. What you can do?
1. Go to Option and check "Enable Logging"
2. Run the scan
3. Once the application freezes you can check the log file in "My Documents" folder to see which file started loading and could not complete.
4. Please send the file to us for an analysis.
5. Remove the file and run a scan - it will continue properly.
6. If the steps above do not help, make sure that your drive is not broken and does not have physical errors. You can try running the ScanDisk application from Windows.
Which duplicate file finder to choose?
Please read this small article on the topic "Which duplicate file finder to choose?"
I removed all my duplicate audio files, but they are still displayed in iTunes, but when I click a song in iTunes it is not found.
There is nothing wrong. Audio Dedupe is not designed to remove duplicates only in certain applications as users may prefer iTunes, WinAmp, Windows Media Player or any other player. For this reason Audio Dedupe is not specific to a player - it will remove all the duplicate audio files from your computer or network.
Why the duplicate entries still appear in my favorite player and how to remove them?Most audio, video and other players keep a play list which contains links to the files on your hard drive. When you clean your computer or network using Audio Dedupe the duplicates are removed, but some entries in the play list still points to the now missing files. What you have to do is just clear the play list and add the files to your favorite player. This will remove the missing entries and update the play list with the files that are present after the cleanup.