

Find and delete duplicate photos on your Windows device to free up valuable space and improve organization. Follow these effective methods to manage duplicate photos.
Table of Contents
- Manual Inspection
- Using Windows Search
- Delete Duplicate Photos Using File Explorer
- Search for Duplicate File Names
- Using Duplicate File Finder Software
- Best Practices for Safe Deletion
- Automatically Delete Duplicate Photos
Manual Inspection
Embarking on a manual inspection of your photo collection involves a hands-on approach to sift through each image individually. While it may seem laborious, this method offers a level of precision and control unmatched by automated tools, making it particularly useful for smaller collections or instances where subtle differences between photos need to be discerned.
As you navigate through your photos one by one, take note of any duplicates you encounter. Look for identical images or those with minor variations that may indicate duplicates. Pay attention to details such as file names, timestamps, and visual similarities between photos. While this method requires patience and diligence, it allows you to thoroughly review each photo and ensure the accuracy of your duplicates identification process.
Additionally, manual inspection provides an opportunity to reminisce and reflect on your photo collection, allowing you to appreciate cherished memories captured in each image. Although time-consuming, this hands-on approach can be a rewarding journey through your photographic history, offering a deeper connection to your memories and the stories they hold.
Using Windows Search
In the realm of digital clutter, duplicate photos are an all-too-common nuisance, occupying valuable storage space and complicating the task of organizing your digital archives. Fortunately, Windows Search emerges as a powerful ally in the battle against these redundant images. Let’s delve into what Windows Search is and how it can aid in the quest to identify and eliminate duplicate photos from your collection.
Understanding Windows Search
Windows Search is a built-in feature of the Windows operating system, designed to swiftly locate files, programs, and other items on your computer. This robust search tool enables users to quickly sift through vast amounts of data, employing various search parameters to pinpoint specific files or types of content.
How Windows Search Helps Find Duplicate Photos
When it comes to tackling duplicate photos, Windows Search offers a multifaceted approach that streamlines the identification process:
Comprehensive File Indexing: Windows Search operates by indexing the contents of your storage drives, creating a catalog of file properties such as names, dates, and sizes. This indexing facilitates swift and efficient searches, allowing users to locate duplicate photos based on various criteria.
Advanced Search Filters: Windows Search provides an array of search filters that empower users to refine their quest for duplicate photos. By specifying parameters such as file type, size, and modification date, users can narrow down search results to identify potential duplicates more effectively.
Visual Preview: In newer versions of Windows, including Windows 10, Windows Search incorporates visual previews that offer a glimpse into the contents of image files. This feature enables users to visually compare photos within the search results, aiding in the identification of duplicate images based on visual similarities.
Batch Operations: Once duplicate photos are identified using Windows Search, users can leverage batch operations to manage these redundant files efficiently. Windows Explorer allows for easy selection and deletion of duplicate photos, streamlining the cleanup process and reclaiming valuable storage space.
Utilizing Windows Search to Delete Duplicate Photos
To harness the power of Windows Search in your quest to eliminate duplicate photos, follow these simple steps:
- Open File Explorer: Navigate to the folder or drive containing your photo collection using Windows File Explorer.
- Initiate a Search: In the File Explorer window, locate the search bar in the top-right corner. Enter a search query, such as “*.jpg” to search for all JPEG image files, or specify other criteria relevant to your search for duplicate photos.
- Review Search Results: Windows Search will display a list of files matching your search criteria. Take advantage of visual previews and file details to identify potential duplicate photos within the search results.
- Select and Delete Duplicates: Once duplicate photos are identified, select them using standard Windows selection methods (Ctrl + Click for individual selection, Ctrl + A for selecting all). Right-click on the selected files and choose “Delete” from the context menu to remove duplicate photos from your collection.
In Conclusion
Windows Search emerges as a valuable tool in the fight against duplicate photos, offering a combination of robust search capabilities, advanced filters, and visual previews to streamline the identification and deletion process. By leveraging the power of Windows Search, users can efficiently declutter their photo collections, reclaiming storage space and simplifying the task of organizing digital archives.
Delete Duplicate Photos Using File Explorer
In the digital age, where our photo collections grow exponentially, managing duplicates becomes a necessity. Fortunately, Windows File Explorer provides a straightforward method for identifying and deleting duplicate photos. In this article, we’ll explore how you can leverage File Explorer to streamline your photo collection management and free up valuable storage space.
Understanding File Explorer
File Explorer is a built-in file management tool in Windows operating systems, allowing users to navigate folders, view files, and perform various file operations. Its intuitive interface and powerful features make it an ideal tool for managing digital files, including photos.
Identifying Duplicate Photos
Before we dive into the deletion process, it’s essential to identify duplicate photos within your collection. Here’s how you can do it using File Explorer:
- Navigate to Your Photo Folder: Open File Explorer and navigate to the folder containing your photo collection.
- Use “Group By” or “Sort By” Options: File Explorer offers “Group By” and “Sort By” options, allowing you to organize files based on specific criteria such as name, size, or date modified. Utilize these options to group photos by name or size, making it easier to spot duplicates.
- Manually Review for Duplicate Filenames or Sizes: Once files are grouped, manually review them for duplicate filenames or sizes. Duplicate photos often have similar or identical filenames, or they may have the same dimensions and file sizes.
- Compare Image Previews: File Explorer provides thumbnail previews of image files, enabling you to visually compare photos for duplicates. Look for visually similar images and duplicates that may have slight variations.
Deleting Duplicate Photos
Once you’ve identified duplicate photos using File Explorer, it’s time to remove them from your collection. Follow these simple steps:
- Select Duplicate Photos: Using standard Windows selection methods (Ctrl + Click for individual selection, Ctrl + A for selecting all), choose the duplicate photos you want to delete.
- Right-Click and Choose “Delete”: Right-click on the selected duplicate photos and choose “Delete” from the context menu. Alternatively, you can press the “Delete” key on your keyboard.
- Confirm Deletion: File Explorer will prompt you to confirm the deletion of the selected files. Confirm the action to permanently remove the duplicate photos from your system.
Best Practices for Deletion
While deleting duplicate photos using File Explorer is a simple process, it’s essential to follow best practices to avoid accidental deletion of important files:
- Backup Your Photos: Before deleting any files, ensure you have a backup of your photo collection to prevent data loss.
- Review Results Carefully: Double-check your selection to ensure you don’t delete important photos accidentally.
- Use Undo Feature: In case of accidental deletion, File Explorer provides an “Undo” feature to restore deleted files immediately.
Conclusion
File Explorer offers a convenient and effective solution for deleting duplicate photos from your collection. By leveraging its grouping, sorting, and selection features, you can quickly identify and remove duplicates, optimizing your photo library and freeing up storage space. Incorporate these simple steps into your photo management routine to maintain a clutter-free and organized collection.
Search for Duplicate File Names
Once you’ve opened the folder containing your photos in File Explorer, the next step is to utilize the “View” tab to access detailed file information. By selecting the “Details” view option, you can display essential details such as file names, dates, and sizes, providing a comprehensive overview of your photo collection.
Sorting files by name is a straightforward way to identify potential duplicates based on identical filenames. To do this, simply click on the “Name” column header in File Explorer, and the files will be sorted alphabetically. This arrangement makes it easier to spot duplicate filenames that appear consecutively or share similar naming conventions.
As you review the sorted list of files, pay close attention to any instances where file names are identical or nearly identical. Duplicates may have subtle variations in naming, such as additional numbers or letters appended to the file name. Take note of these similarities and consider them as potential duplicates for further inspection.
While searching for duplicate file names is a useful method, it’s important to remember that identical filenames alone may not necessarily indicate duplicate photos. Different photos may have identical filenames if they were sourced from the same camera or if you’ve used generic naming conventions. Therefore, it’s essential to combine this method with visual inspection or other criteria to confirm duplicate status accurately.
By leveraging File Explorer’s sorting and viewing options, you can efficiently search for duplicate file names within your photo collection, streamlining the process of identifying and managing duplicates. This method offers a simple yet effective way to declutter your photo library and ensure a more organized and streamlined digital archive.
Using Duplicate File Finder Software
Third-party software can efficiently find and remove duplicates. These tools offer advanced features and save time, especially for large photo libraries.
Step-by-Step Guide Using Software
- Download and Install: Choose a reputable duplicate photo remover tool and install it.
- Scan Your Library: Open the software and start a scan of your photo folders.
- Review Results: Check the detected duplicates and confirm which to delete.
- Delete Duplicates: Follow the software’s instructions to delete the duplicates.
Best Practices for Safe Deletion
- Backup Your Photos: Always back up your photos before deleting anything.
- Review Results Carefully: Ensure you don’t accidentally delete important photos.
- Use Software with Preview Features: This allows you to see duplicates side-by-side before making any deletions.
Automatically Delete Duplicate Photos
Some tools offer automated scanning and removal options. You can schedule regular cleanups to keep your photo library organized.
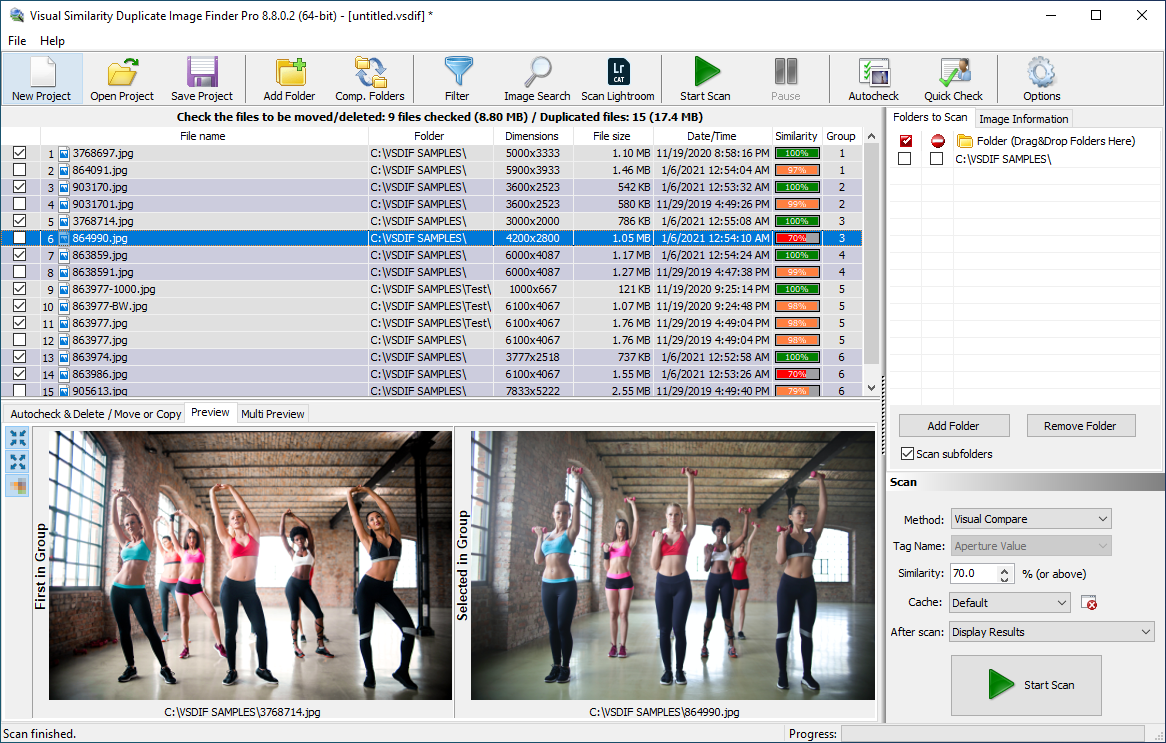
Duplicate photos can clutter your digital photo collection, consume valuable storage space, and make organizing your images a daunting task. Visual Similarity Duplicate Image Finder (VSDIF) by MindGems offers a powerful and efficient solution to delete duplicate photos. This tool not only identifies exact duplicates but also finds visually similar images, making it an essential utility for photographers and digital hoarders alike. In this article, we will guide you through the steps to delete duplicate photos to the recycle bin, permanently delete them, or move them to a backup location.
Step-by-Step Guide to Delete Duplicate Photos
Step 1: Download and Install VSDIF
First, visit the MindGems website to download Visual Similarity Duplicate Image Finder. Install the software by following the on-screen instructions.
Delete Duplicate Photos
Step 2: Launch the Application and Select Folders
Open VSDIF and select the folders you want to scan for duplicate photos. You can add multiple folders, including external drives and network locations, by clicking the “Add Folder” button.
Step 3: Configure Scan Options
Configure the scan options according to your preferences. You can choose between searching for exact duplicates or visually similar images. Adjust the similarity threshold to control the strictness of the match.
Step 4: Start the Scan
Click the “Start Scan” button to begin scanning your selected folders. The software will analyze the images and list the duplicate photos along with their similarity percentage.
Step 5: Review Duplicate Photos
Once the scan is complete, review the list of duplicate photos. VSDIF provides a side-by-side comparison of the images, making it easy to decide which duplicates to keep or delete.
Deleting Duplicate Photos to the Recycle Bin
Step 1: Select Duplicate Photos
Select the duplicate photos you want to delete by checking the corresponding boxes next to each image.
Step 2: Delete to Recycle Bin
Click on the “Action” menu and choose “Move to Recycle Bin.” This will move the selected duplicate photos to your computer’s recycle bin, allowing you to restore them if needed.
Permanently Deleting Duplicate Photos
Step 1: Select Duplicate Photos
As before, select the duplicate photos you want to delete.
Step 2: Permanently Delete
Go to the “Action” menu and select “Delete Permanently.” This action will remove the selected duplicate photos from your system without moving them to the recycle bin, freeing up space immediately.
Moving Duplicate Photos to a Backup Location
Step 1: Select Duplicate Photos
Select the duplicates you wish to move.
Step 2: Choose Backup Location
Click on the “Action” menu and select “Move to Folder.” Browse to the desired backup location where you want to store the duplicate photos and confirm your selection.
Step 3: Move Photos
The selected photos will be moved to the backup location, preserving them for future reference while clearing your main storage.
Optimize Your Photo Library with VSDIF
Using Visual Similarity Duplicate Image Finder to delete duplicate photos is a straightforward process that can significantly optimize your photo library. Whether you choose to delete duplicates to the recycle bin, permanently delete them, or move them to a backup location, VSDIF provides flexible options to suit your needs. This powerful tool ensures that your digital photo collection remains organized, clutter-free, and easy to manage.
By following these steps, you can efficiently delete duplicate photos and reclaim valuable storage space, ensuring your photo library is optimized and well-organized.
Managing duplicate photos has always been a headache for me, but this article provided the solution I’ve been searching for. Visual Similarity Duplicate Image Finder is a game-changer! Its ability to identify visually similar images is unmatched, and it saved me so much time and effort. Thanks to the tips and recommendations shared here, I now have a much more organized photo library, and I feel confident in my ability to keep it that way. Highly recommend trying out this tool!
This article is a gem! The methods outlined here truly revolutionized how I manage my photo collection. Visual Similarity Duplicate Image Finder stood out as the ultimate solution. Its ability to not only identify exact duplicates but also visually similar images is unparalleled. Thanks for shedding light on such a powerful tool!
This article came at just the right time for me! I’ve been meaning to clean up my photo library for ages, but I didn’t know where to start. The step-by-step guide provided here, along with the recommendation for Visual Similarity Duplicate Image Finder, made the process straightforward and hassle-free. Now, my photo collection is organized, and I no longer have to sift through countless duplicates to find the images I need. Thank you for sharing such valuable insights!
As someone who’s passionate about photography, keeping my photo library organized is essential. This article provided me with practical tips and recommendations that I immediately put into action. Visual Similarity Duplicate Image Finder exceeded my expectations with its accuracy and efficiency. It’s now my go-to tool for managing duplicate photos. Thanks to the insights shared in this article, I feel more confident in my ability to keep my digital archives in order.
I stumbled upon this article while searching for solutions to declutter my computer, and I’m so glad I did! The guidance provided here, especially regarding Visual Similarity Duplicate Image Finder, was incredibly helpful. This tool is a game-changer for anyone looking to streamline their photo collection. Thanks to the clear instructions and recommendations in this article, I now have a much more organized digital workspace. Highly recommend giving it a read!
Discovering this article was a game-changer for me! I’ve always struggled with managing my photo collection, but the step-by-step guide provided here made the process so much easier. Visual Similarity Duplicate Image Finder was a revelation! Its ability to identify not only exact duplicates but also visually similar images saved me countless hours of manual work. Now, my photo library is organized, and I have peace of mind knowing that I’ve reclaimed valuable storage space on my device. Thank you for sharing such valuable insights!
The step-by-step guide provided invaluable insights into managing duplicate photos. Visual Similarity Duplicate Image Finder exceeded my expectations. It’s fast, accurate, and user-friendly. A must-have tool for anyone serious about photo organization!
I can’t thank you enough for introducing me to Visual Similarity Duplicate Image Finder. It’s incredibly efficient and saved me hours of manual work. This article is a lifesaver for anyone struggling with duplicate photos!
Kudos to the author for such comprehensive methods! Visual Similarity Duplicate Image Finder is a game-changer. Its intuitive interface and advanced features make deleting duplicate photos a breeze. Thanks for simplifying this daunting task!