


If your music folder has ballooned to twice the size it should be, duplicate MP3s are almost always the reason. A few years of downloads, phone transfers, and “just in case” backups, and suddenly you’ve got the same album sitting in three different folders under three different names. Here is how to find duplicate MP3 files on your PC, from the free-but-slow manual approach to the tools built specifically for the job.
- Why Your Music Folder Fills Up With Duplicate MP3 Files
- Finding Duplicate MP3s Manually on Windows
- Why Manual Methods Miss So Many Duplicate MP3 Files
- How to Find Duplicate MP3 Files Automatically With Audio Dedupe
- Keeping Your Library Duplicate-Free Going Forward
- Frequently Asked Questions
Why Your Music Folder Fills Up With Duplicate MP3 Files
It rarely happens on purpose. A few common culprits:
- You downloaded the same track twice – once from a website years ago, once again more recently, and never noticed they landed in different folders.
- You moved your library between devices – an old laptop, a new laptop, a phone backup, a cloud drive – and copies piled up along the way instead of syncing cleanly.
- You ripped a CD more than once – maybe at a different bitrate, or with different tagging software, producing two files that sound identical but share nothing in their filenames or metadata.
- You merged two libraries – yours and a partner’s, or an old backup with a current one – without checking for overlap first.
- Files got renamed inconsistently – “Track05.mp3” next to “ArtistName – SongTitle.mp3,” same song, no obvious connection between them.
None of this is really avoidable if you have been collecting music for more than a few years. What matters is having a reliable way to clean it up.
Finding Duplicate MP3s Manually on Windows
If your library is small – a few hundred songs, one folder – doing this by hand is genuinely fine. It gets painful fast once you are past that, but here is how to do it without any extra software.
Using File Explorer
Open File Explorer and go to your music folder. Switch to Details view from the View tab, then click the Size column header to sort by file size – true duplicates almost always land right next to each other this way. Click Name instead if you would rather sort alphabetically and spot renamed duplicates by artist or title. Typing *.mp3 into the search bar first will filter out any non-audio files mixed into your music folder.
Sorting by ID3 Tags
File size sorting misses duplicates encoded at different bitrates. A more thorough manual approach is to sort by ID3 tag fields – right-click the column header row in Details view, select “More,” and add Title and Artist as visible columns. Sort by Title and any tracks sharing the same song name will group together regardless of filename. This catches a category of duplicate music files that size sorting walks straight past – same recording, properly tagged, just saved twice under different filenames or in different folders.
Using the Command Line
PowerShell can list files that share an identical size, which is a decent first pass at spotting duplicates:
Get-ChildItem -Path C:\Music -Recurse | Group-Object Length | Where-Object { $_.Count -gt 1 } | Select-Object Group
This just flags files worth a closer look – you will still need to confirm they are actual duplicates and delete them yourself.
Using iTunes or Apple Music
If your library lives in iTunes or Apple Music, there is a built-in duplicate checker: File > Library > Show Duplicate Items. It is convenient if that is already where your music lives, but it only catches duplicates it can see inside your iTunes library – not MP3 files scattered elsewhere on your drive.
The problem with all of the above: none of it listens to the actual audio. It compares names, sizes, or metadata – which means a duplicate MP3 saved under a different name, ripped at a different bitrate, or converted from another format will slide right past every method here.
Why Manual Methods Miss So Many Duplicate MP3 Files
Here is what trips people up: two MP3 files can contain the exact same song and still look completely different to your file system. Different bitrate, different encoder, different tags, a different filename from a different download source – and suddenly a size-sort or a filename search will not catch it, even though it is unmistakably the same track if you played both files back to back.
That is the gap that content-based audio comparison closes. Instead of looking at file properties, a tool like Audio Dedupe actually analyzes the audio itself – so it finds duplicate MP3 files regardless of what they are named, what bitrate they were encoded at, or which application originally created them.
How to Find Duplicate MP3 Files Automatically With Audio Dedupe
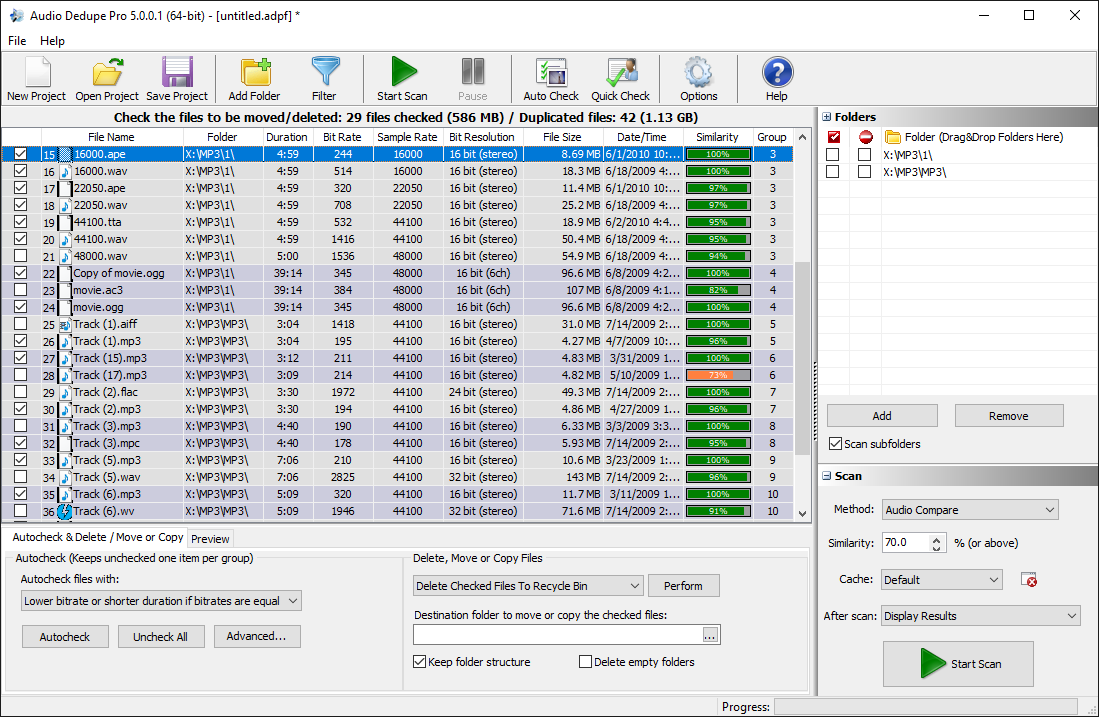
Audio Dedupe is built specifically to find duplicate MP3 and other audio files by comparing what is actually in the recording, not just filenames or file sizes. It also catches similar audio files – tracks that have been re-encoded, converted to a different format, or trimmed slightly – not just exact byte-for-byte duplicates. That is the difference between it and every manual method above: it catches renamed files, re-encoded files, and files pulled from completely different sources, as long as the underlying audio matches.
A few things it handles well:
- Compares actual sound, not metadata – two files with nothing in common on paper still get matched if the audio itself is the same.
- Covers more than just MP3 – WAV, FLAC, AAC, OGG, WMA, AIFF, and other common formats are all supported in the same scan, so a duplicate MP3 that was also saved as a FLAC will still be detected.
- Lets you preview before deleting anything – a built-in player means you can listen to a match before committing to remove it.
- Backs up before it touches anything – so a scan mistake does not cost you a file you actually wanted to keep.
Getting Started Takes Four Steps
- Download and install the app from the Audio Dedupe page. It runs on Windows 11, 10, 8, and 7.
- Add your music folder – open the app, click Add Folder, and point it at wherever your MP3 files live. You can add multiple folders or an entire drive.
- Pick a scan mode and run it – Exact Match if you only want byte-identical files, or Similar Sound if you want it to catch re-encoded or slightly altered duplicates too. Hit Start Scan.
- Review and clean up – the results list every match found. Preview anything you are unsure about with the built-in player, decide what to keep, and delete the rest in one pass.
Keeping Your Library Duplicate-Free Going Forward
A clean scan does not stay clean forever unless you build a couple of habits around it:
- Keep music organized into artist and album subfolders instead of one large dump folder – it makes it obvious when a track is already there before you download it again.
- Check your existing library before adding new tracks, especially if you are pulling from multiple sources.
- Stick to one music manager rather than juggling iTunes, a phone app, and a separate media player that all sync independently.
- Run a scan every few months rather than waiting until the clutter becomes a problem again.
- Back up before any large cleanup – not because the tools are unreliable, but because it costs nothing and gives you a safety net if you change your mind later.
Manual sorting is fine for a small collection, but for anything beyond a few hundred tracks it stops being a reasonable way to spend an afternoon. Download Audio Dedupe for free and run a scan on your own library – it usually turns up more duplicate MP3 files than people expect.
You can also check our best duplicate song finder comparison and duplicate music finders similar audio detection precision tests.