

We have listed the top 5 best ways to export folder structure to Excel, CSV, or XML. You can additionally export a directory of folders contained within a specific drive or directory. There are also features available for exporting a list of files.
Folder Size is an advanced free folder and file size analysis tool. It can export all file and folder information to Excel, XML, or CSV. It can also export folder structure to PDF or print to the printer. These are just a few of the countless features of Folder Size. In addition, it can list the largest folders and files, analyze the disk space using neat pie and bar charts, and list the largest and oldest files in a folder and all its subfolders. That is to say, it is the best tool for locating missing disk space – it will display the size distribution of all your files and folders.
Download Folder Size now and save valuable disk space by removing large unused files and folders. Please take a look at this article If you are interested in printing folders. There is also a detailed article on how to print files or folders.

Export Folder
List of top 5 best ways to export folder structure to Excel:
- Export Folder Structure to Excel
- Export Folder Structure to XML or Text Files
- Export Folders List to Excel
- Export Folder Structure From Command Line
- Exporting Folders with the TREE Command
1. Export Folder Structure to Excel – CSV Text Files
Exporting folder structures to Microsoft Excel and CSV text files is a fundamental aspect of efficient file organization and documentation. When transferring directory hierarchies to Excel, users gain the advantage of creating a visually comprehensive spreadsheet, allowing for easy analysis and manipulation of the data. Excel’s flexibility and familiarity make it a practical choice for users who prefer a tabular representation of their folder structures. On the other hand, exporting to CSV text files offers a streamlined and universally compatible format. CSV’s simplicity facilitates seamless integration with various applications and programming languages, making it an excellent choice for data exchange and interoperability. Whether opting for the structured grid of Excel or the straightforward text-based approach of CSV, both methods contribute significantly to enhancing file system management and accessibility.
Steps to export folder structure to Excel:
- To Export folder only, go to options and un-tick “Export file details”.
- Perform a scan on the target folder or drive from which you intend to export the folder structure.
- Click “File->Export As…”, choose a file name, and select Save As: CSV Excel File.
CSV – Comma Separated Values are natively supported in Excel and will be displayed as a table. You can customize various options in the export settings tab. If you do not want to export the subfolders you can limit to which folder depth to export. The “Maximum export depth” by default is set to 0 meaning unlimited.
You can include all the file information in your export if you keep the “Export file details” checkbox ticked.
2. Export Folder Structure to XML
XML (eXtensible Markup Language) provides a versatile and standardized format for exporting folder structures, offering a structured and easily readable representation of data. This section delves into the specifics of exporting folder structures to XML, covering essential aspects of the process.
Steps to export folder structure to XML:
- Scan the target folder or drive from which you intend to export the folders.
- If you do not want to include files in your export un-tick “Export file details” in the settings.
- Click “File->Export As…”, choose a file name, and select Save As: XML File.
These options will export a hierarchical structure of your directories together with their subdirectories. If you do not want to export certain folders you can simply remove them from the folder tree in the application. Make sure that you use the REMOVE option which removes the item from the folder tree. If you choose the DELETE option you will get a warning that you are trying to delete the folder from your storage.
You can easily display XML files in a web browser. You can also use them to import the data from other applications.
Folder and File Export Options
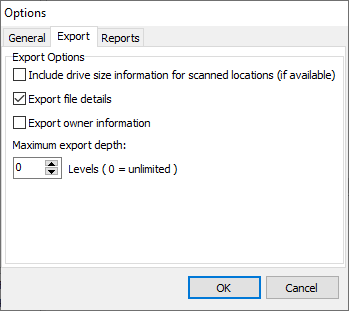
Folder and File Export Options
The above options determine the export settings for the full “Export As…” feature. An explanation of each item follows below.
Include drive size information for scanned locations (if available)
The option name is clear enough – it includes information for the used, free, and total space of the drive which contains the scanned files. The “if available” part is there because certain types of network share do not contain such information.
Export File Details
Determines if the file information will be included in the exported files. To clarify, untick the option to export folder list/tree only. Large scans may contain many items and the exported files can grow large. Therefore, if you do not need the file information it is better to un-tick the option.
Export Folder/File Owner Information
The owner information is usually not needed and is not exported by default. Another reason to exclude this information by default is that the Windows API for obtaining such information is quite slow. Therefore it may slow down the entire export if it contains a large number of files or folders.
Maximum Folders Export Depth
The option is set to 0 (ZERO) by default which translates to UNLIMITED – export all levels. In short, it limits the depth of the exported folders and starts from the top-level inclusive. The number determines how deep the tool should export.
3. Export Folders List to Excel, CSV, TEXT
Exporting folders to Excel, CSV, or plain text is essential for systematic file management. Excel provides a structured spreadsheet format for organized data analysis. CSV offers a lightweight, universally compatible format for seamless data exchange. Exporting to plain text produces a straightforward, human-readable representation of the folder structure. These export options cater to diverse user preferences and organizational needs, facilitating efficient documentation and analysis of folder hierarchies.
You can export a list of all the folder names inside a drive or folder too.
Steps to export folder structure to Excel, CSV, and TEXT:
- Go to options and tick “Do not list files”
- Scan the drive or folder that you want to export and click on it in the folder tree on the left.
- Click “Export details view…” from the toolbar or the file menu.
- Choose a file name and click “Save”
This will export the folder list in the details view to an Excel CSV text file. If you want to include the files in your export then you can untick the option in Step 1.
If you want to remove folders or files from the exported list, select them right-click the selection, and choose “Remove” from the popup menu.
4. Export Folder Structure From Command Line
Here is a detailed folder export command:
FolderSize -scan "F:\mp3" -exp "d:\mp3_{DATE} {TIME}.xml;d:\mp3_{DATE} {TIME}.fsp;d:\mp3_{DATE} {TIME}.csv" -s -exp-depth 4 -exp-files-off -exp-drive-info-on
-scan <path> – specifies a path that will be scanned. You can specify multiple paths by separating them with a semicolon. You should enclose in quotes all paths that contain spaces. E.g.: -scan c:\mp3;“c:\path with space”
-exp <semicolon delimited list of export formats> – Export command line parameter. Depending on the file extension will export the corresponding file type. You can export multiple formats at once by separating the paths with semicolons. Use the variables {DATE} and {TIME} to include the current date and time in the file names.
Export Options and Flags
Export options below have on and off states. If you omit an option the value from the application GUI settings is used for backward compatibility. If you do not want that, you should explicitly specify the desired state of the option. Please note that the settings below will be set in the application. If you use the “-s” (silent) option they will not be stored. If you omit the “-s” option, closing the application window will store the command line settings in the application’s settings.
-exp-drive-info-on
-exp-drive-info-off – Include/exclude information for the drive size, free and used space in the exported file if available. Such information may not be available for some network shares.
-exp-files-on
-exp-files-off – Include/exclude information for the files in the exported file.
-exp-owner-on
-exp-owner-off – Include/exclude owner information for the files and folders. This option is disabled by default. The Windows API for obtaining OWNER information is very slow and may cause poor performance for large folder listings. Therefore, if you do not need the owner’s information we recommend you keep the option disabled.
-exp-depth XX – Determines how many levels deep to export from the top folder inclusive. XX is a round value equal to 0 (zero) or higher. The default value is 0 (zero). It means that the tool will export ALL the data – unlimited.
-s – stands for SILENT. Use the option to hide the GUI during the scan. The application will exit after it processes the command line actions. However, you can omit the option to display the GUI. As a result, it will stay on screen after it processes all the command line actions.
Folder Tree XML Export File format sample:
<fo tc="4/9/2011 12:18:02 AM" ta="7/1/2011 8:34:40 AM" tm="7/1/2011 8:34:40 AM" at="8208" fic="1" foc="0" s="1721" ow="WIN-LQEN7914IFU\Chris" >
<n>
<![CDATA[Toolbar]]>
</n>
<fo tc="7/1/2011 8:34:26 AM" ta="7/1/2011 8:34:40 AM" tm="7/1/2011 8:34:40 AM" at="8224" s="1721" ow="WIN-LQEN7914IFU\Chris" >
<n>
<![CDATA[broker_metrics.xml]]>
</n>
We have shortened the attributes and tags of the XML file to reduce file size. As a result, the size of the files gets smaller. Bear in mind that those files may contain millions of items and every character counts.
Exported Folder Structure XML Attribute and tag names:
- fo – Folder/file object
- tc – Time created
- ta – Time accessed
- tm – Time modified
- at – Attributes – decimal representation of the file/folder attributes. These are all the standard Windows file attributes. Read more: https://docs.microsoft.com/en-us/windows/win32/fileio/file-attribute-constants
- fic – Files count
- foc – Folders count
- s – Size
- ow – Owner
- n – Name is stored in a CDATA section to support multiple language characters.
5. Exporting Folder Structures with the TREE Command
Exporting folder structures is a common task in file management, and the TREE command in the command line provides a straightforward way to achieve this. This tutorial will guide you through the process of using the TREE command to export folder structures to a text file, facilitating easy analysis and documentation.
Step 1: Open the Command Prompt Begin by opening the Command Prompt on your Windows system. You can do this by pressing Win + R, typing “cmd,” and hitting Enter.
Step 2: Navigate to the Target Directory Use the cd command to navigate to the directory for which you want to export the folder structure. For example:
cd C:\Your\Target\Directory
Step 3: Run the TREE Command Execute the TREE command to generate the folder structure. You can use various options to customize the output. For a basic tree structure, use:
tree
Step 4: Export to a Text File To export the folder structure to a text file, use the > operator followed by the desired file name. For instance:
tree > FolderStructure.txt
Step 5: Review the Exported File Navigate to the location where you ran the command and find the exported text file. Open it with a text editor to review the folder structure.
Additional Options:
- Customize Output: Use options like /F to display filenames and /A to specify attributes.
- Adjust Depth: Limit the depth of the tree with /L n, where “n” is the desired level.
Example:
tree /F /A > FolderStructure.txt
Utilizing the TREE command in the command line simplifies the process of exporting folder structures. Whether for documentation or analysis, this method offers a quick and efficient solution for obtaining a comprehensive view of your file system hierarchy. Experiment with different options to tailor the exported data to your specific needs.
Conclusion
MindGems Folder Size proves exceptionally useful for exporting folders and files, offering a powerful set of features for efficient file management. The software’s ability to analyze and visualize folder sizes provides users with a clear understanding of their storage allocation. One of its standout features is the seamless export functionality, enabling users to export detailed lists of folders and files effortlessly. This proves invaluable for tasks such as generating reports, conducting audits, or simply organizing and archiving data. Whether exporting to popular formats like Excel or CSV or utilizing custom export options, MindGems Folder Size empowers users to tailor their exports according to specific needs. The software’s intuitive interface and robust export capabilities make it an indispensable tool for those seeking precision and control in managing their file and folder structures.
Folder Size is a valuable tool for efficiently identifying the largest files and finding the largest folders on your storage. Its advanced features enable quick location and management of space-consuming elements. Moreover, the software offers versatile options, allowing users to print folders to paper, PDF, and TIFF, including the ability to print the entire folder tree. This makes it an indispensable resource for users seeking not only to analyze and manage file sizes but also to document and print their folder structures for various purposes.
The article relates to:
Easy guide to export folder structure.
How do I export a list of folders?
Can I extract files from multiple folders?
How do I print a folder tree structure?
I want to create a directory structure in Excel?
Guide to write a folder structure?
Help to export a folder structure?
Info to get a list of folders and subfolders?
How do I export a list of files from a folder into Excel?
Can I extract files from multiple folders?
Pingback: Find Long Paths & Long File Names
I would like to have the old UI where all drive summaries are on the right top and not left bottom