

Learn how to scan your photo library and remove corrupted images automatically. Find and remove corrupted photos and maintain a healthy image collection.
Managing large image collections can be daunting, especially when corrupted files begin to clutter your storage. These damaged files waste valuable space and can disrupt workflows, particularly for photographers, designers, and content creators. Detecting and removing them manually is tedious, error-prone, and time-consuming.
- Remove Corrupted Images Using Windows Explorer
- Remove Corrupted Images Automatically
- Why Automated Methods to Remove Corrupted Images are Superior to Manual Methods
- Conclusion
This guide explores how to scan, find, and remove corrupted image files, helping you maintain an organized and efficient digital workspace.
Remove Corrupted Images Using Windows Explorer
One of the simplest ways to identify corrupted images is by manually inspecting them through Windows Explorer. This method requires no additional software, making it a viable option for users who prefer a built-in approach. However, while this technique may work for small image collections, it has several limitations, including inefficiency, high time consumption, and susceptibility to errors. Moreover, detecting corruption becomes even more difficult if Windows Explorer’s preview function does not support certain image formats.
In this section, we’ll walk through a step-by-step method for manually finding corrupted image files using Windows Explorer, along with examples highlighting its challenges. Later, we’ll explore automated tools like Visual Similarity Duplicate Image Finder (VSDIF), which provide a much faster and more effective solution for identifying damaged files across multiple formats.
Method: Manually Finding Corrupted Images in Windows Explorer
Step 1: Enable File Previews in Windows Explorer
Before manually checking images, ensure that thumbnail previews are enabled in Windows Explorer.
- Open File Explorer and navigate to the folder containing your images.
- Click on the View tab at the top.
- Select Large Icons or Extra Large Icons to generate thumbnail previews.
- If previews are not displaying, click Options → Change folder and search options.
- Under the View tab, uncheck Always show icons, never thumbnails and click Apply.
Example Issue: If an image is corrupted, its thumbnail might not generate correctly. Instead, it may appear as a broken icon or completely blank.
Step 2: Open Suspected Corrupted Images
Even if the thumbnails appear correctly, some images may still be corrupted internally. To verify:
- Double-click the image to open it in the default viewer (e.g., Windows Photos or Paint).
- If the image fails to open, try opening it in an alternative program like IrfanView, GIMP, or Photoshop.
- Look for signs of corruption, such as:
- Error messages like “Windows Photo Viewer can’t open this picture”.
- Distorted visuals, missing sections, or pixelated artifacts.
- Incomplete loading, where only part of the image is displayed.
Example Issue: A JPEG file may open but display gray bars, missing color data, or random pixel noise—signs of partial corruption due to file damage.
Step 3: Sort by File Size to Detect Potential Issues
Sometimes, corrupted images have abnormally small or large file sizes compared to other images of the same type. To detect suspicious files:
- Open File Explorer and navigate to your image folder.
- Click the View tab → Details to switch to the detailed list view.
- Click the Size column to sort images by file size.
- Look for files that seem unusually small or large compared to others in the folder.
Example Issue: If most JPEGs in a folder are around 2MB, but one is only 5KB, it could be a sign of corruption or an incomplete file transfer.
Step 4: Check File Extensions and Attempt to Convert
Occasionally, a corrupted file may have an incorrect or missing extension. To verify and attempt a fix:
- Right-click the suspected file and select Properties.
- Check the Type of file field under the General tab.
- If the file extension seems incorrect (e.g., a PNG saved as .TMP), try renaming it to the correct extension.
- Use an image converter (e.g., XnConvert or Photoshop) to attempt a format conversion.
Example Issue: A photo taken on a camera might be saved as a .JPG but fails to open. Renaming it to .JPEG or converting it to .PNG may restore accessibility.
Limitations of the Manual Method
While Windows Explorer provides a basic way to identify corrupted images, this approach has several drawbacks:
- Only works for formats that Windows supports (JPEG, PNG, BMP).
- Cannot scan RAW files or proprietary formats from cameras (e.g., CR2, NEF, ARW).
- Time-consuming and inefficient, especially for large collections.
- Prone to human error, as some corrupted files may not appear obviously broken.
If you have thousands of images across different formats, manually checking them would be extremely slow and unreliable. This is where automated tools like Visual Similarity Duplicate Image Finder (VSDIF) come in.
A Faster and More Reliable Solution: Automated Tools
Instead of manually opening and inspecting each file, Visual Similarity Duplicate Image Finder (VSDIF) can quickly scan large image collections and detect corrupted, missing, or duplicated images—regardless of file format. In the next section, we’ll explore how VSDIF simplifies this process and makes it far more efficient than manual detection.
Remove Corrupted Images Automatically
Manually searching for corrupted images can be a slow, tedious, and error-prone process, especially when dealing with thousands of images across multiple folders and formats. A more efficient and accurate approach is to use Visual Similarity Duplicate Image Finder (VSDIF), an advanced tool designed for organizing and managing photo collections.
While VSDIF is primarily used for finding duplicate and similar images, it also offers an effective way to detect and identify corrupted image files. Whether the corruption is partial (e.g., an image that does not display correctly) or severe (e.g., a file that crashes applications when opened), VSDIF can help pinpoint these problematic files.
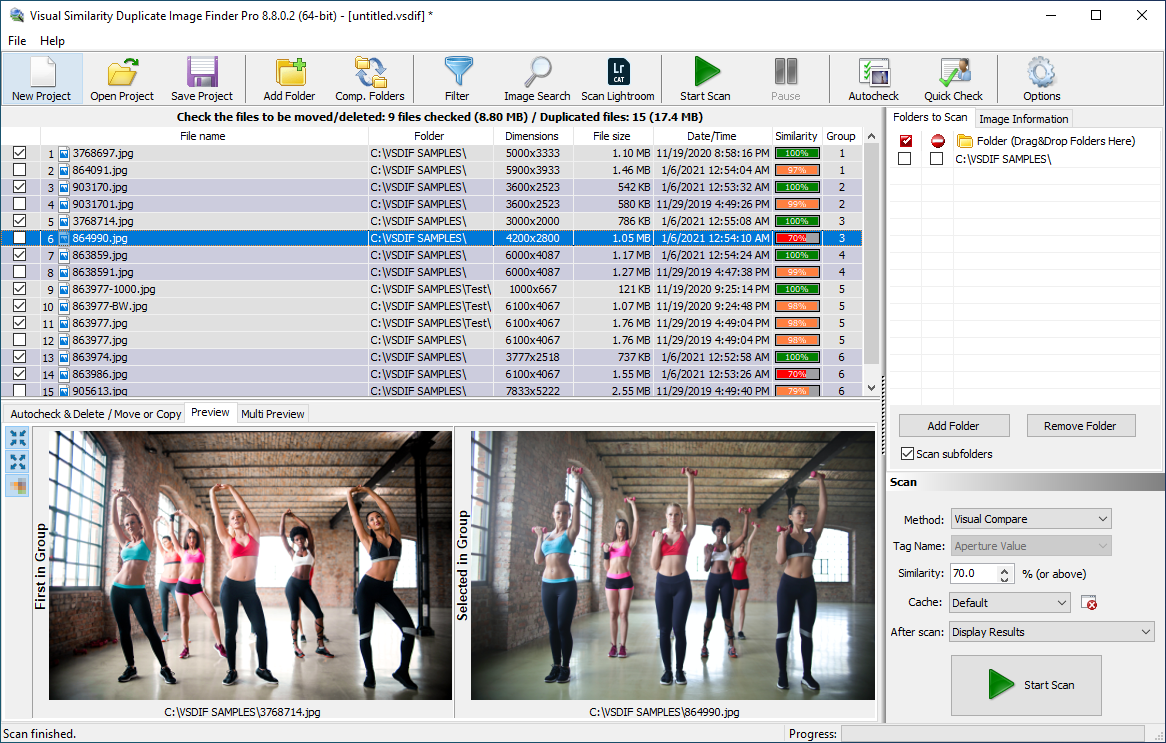
Visual Similarity Duplicate Image Finder – A Powerful Tool for Image Organization
Duplicate Image Finder is a robust image management tool that uses advanced visual similarity algorithms to identify duplicate and similar-looking images, even when resized, edited, or saved in different formats. Unlike basic duplicate finders that compare filenames or file sizes, VSDIF analyzes actual image content, making it highly accurate and effective.
Remove Corrupted Images
Key Features of VSDIF:
- Finds exact and similar images regardless of format, resolution, or minor modifications.
- Supports all major image formats, including RAW files from professional cameras.
- Fast and efficient scanning even for large image collections.
- Helps organize and clean up disk space by removing duplicate and redundant images.
- Detects corrupted image files that cannot be loaded or cause system crashes.
Although detecting corrupted images is just a small part of what VSDIF can do, it provides an invaluable feature for users who need to clean up and maintain the integrity of their image collections. Below, we’ll explore two methods for finding damaged image files using VSDIF.
How to Find Corrupted Images Using VSDIF
Method 1: Detect Corrupted Images That Cannot Be Loaded
VSDIF automatically attempts to load every image during a scan. If an image file is corrupted and cannot be opened, it will be listed at the end of the scan. This provides an easy way to identify and remove damaged images from your collection.
Steps to Find Corrupted Images That Cannot Be Loaded:
- Launch VSDIF and click Add Folder(s) to select the directories you want to scan.
- In the Scan Mode dropdown menu, choose Visual Compare (this mode detects duplicates and similar images based on content).
- Click Start Scan to begin analyzing the images.
- Once the scan is complete, review the results. Any corrupted images that failed to load will be listed separately at the end of the scan.
Example: If you have a folder with 10,000 images, VSDIF will attempt to process all of them. If 20 files are corrupted, they will be flagged and displayed in the final report.
Method 2: Identify Severely Corrupted Images That Cause Application Crashes
Some image files are so badly corrupted that they cause applications to crash when opened. These files may not only be damaged but could also be generated by low-quality software that does not comply with standard image formats. Fortunately, VSDIF can help you identify such files as well.
Steps to Detect Images That Cause Freezes or Crashes:
Since scanning large collections processes a huge volume of data, VSDIF may encounter damaged files that prevent it from completing the scan. To pinpoint these files:
- Ensure a Fresh Scan Cache:
- Open VSDIF and go to Options.
- Select Use NEW CACHE or NO CACHE to avoid reusing old scan data.
- Enable Logging:
- Navigate to Options and check Enable Logging.
- This will create a log file that records every step of the scan, including any errors.
- Run the Scan:
- Start the scan as usual by selecting Visual Compare mode and choosing the folders to analyze.
- If VSDIF freezes or crashes, this is a sign that it encountered a severely corrupted image file.
- Analyze the Log File to Find the Problematic Image(s):
- Open the VSDIF_Log.txt file (located in My Documents or Libraries\Documents).
- Use Notepad or any text editor to search for the word “ERROR”.
- If an error is found, the file listed next to it is likely the corrupted one.
- If no error appears, examine the last 10 files loaded before the crash—one of them is likely causing the issue.
- Remove the Corrupted File(s) and Rescan:
- Delete or move the identified file(s) to another location.
- Restart VSDIF and run the scan again—this time, it should complete without freezing.
Example: If you have a folder with 100,000 images, one or two files may be severely damaged and cause crashes. By checking the log file, you can quickly pinpoint and remove the problematic images, preventing further issues.
Why Automated Methods to Remove Corrupted Images are Superior to Manual Methods
While it is possible to find corrupted images using Windows Explorer, this manual approach is:
- Extremely slow, especially for large image collections.
- Limited to formats that Windows can preview (it cannot detect RAW file corruption).
- Prone to human error, as some corrupted files may still display a thumbnail.
In contrast, Visual Similarity Duplicate Image Finder provides a faster, more accurate, and fully automated way to identify corrupted images.
Benefits of Using VSDIF to Remove Corrupted Images:
- Scans thousands of images in minutes instead of hours.
- Detects corruption in any image format, including RAW, TIFF, and PSD.
- Automatically flags images that cannot be opened.
- Finds images that cause application crashes, saving time and frustration.
By leveraging VSDIF’s powerful scanning capabilities, users can effortlessly locate and remove damaged images, ensuring their collections remain clean and well-organized.
Conclusion
Removing corrupted images manually is not only inefficient but also impractical for large collections. With Visual Similarity Duplicate Image Finder (VSDIF), users can quickly identify damaged files, remove problematic images, and optimize their photo libraries.
While detecting corrupted images is just a small part of what VSDIF can do, its ability to find duplicates, organize images, and free up storage space makes it an essential tool for photographers, designers, and anyone managing a large image collection.
By following this detailed guide you can remove corrupted images from your library.
This guide was exactly what I needed! I had so many corrupted images cluttering my drive, and I didn’t even realize how easy it was to detect and remove them with the right tools. Thanks for the clear and practical advice!
Great article! I’ve struggled with corrupted image files for years, and this explained the problem and solutions in a way that made sense. The recommended tools worked perfectly, and I freed up a ton of space!
I appreciate the step-by-step approach in this guide. Finding and removing corrupted images used to be a nightmare, but with the tips here, I was able to clean up my photo collection in no time. Highly recommend!
MindGems always delivers high-quality, useful content! This article helped me identify corrupted images quickly, and the automated tools saved me hours of manual work. Keep up the great work!
I didn’t realize how many corrupted images were hiding in my folders until I followed this guide! The explanations were clear, and the recommended software was easy to use. Thanks for the valuable tips!
I have thousands of image (jpg) files I restored from backups, in which almost all are corrupted. I just want to eliminate all the corrupted ones. I believe VISDIF would be the right app for me, but I’m not sure. I downloaded it thinking I could at least be able to verify if it could work, but I can’t even seem to get the app to register that it see’s any file. If I purchase the app, only to find I can’t get it to work, is there a return policy? Do you happen to have any better instructions?
Hello
1. If you do not see any results then most likely a poor antivirus app on your system is silently blocking access to the files. Read here how to solve such issues : https://www.mindgems.com/info/fix-move-delete-copy-issues.html
2. Make sure that you have not tweaked any settings. The application is tuned to produce best results by default. If you changed settings uninstall/install to reset all to their defaults and only add your folders and click START SCAN.
3. The demo version will identify and list damaged files if there any, but will not reveal their names. It is sufficient for a proper test and evaluation. You should not place an order if the tool does not fit your needs.